Thursday, December 9, 2010

Monday 12/13/2010

Pot Luck Supper and
Christmas Embellishment Exchange.

Memory Bound will be providing meat, drinks, plates, napkins and goody
bags. Please bring a salad, chips, appetizer or dessert to share. (approximately 10 people)
We will have a Christmas embellishment exchange. Fill a sandwich bag
with embellishments (please gift wrap them) and we will have a game
to play for exchanging them.
Are you doing a December Daily album? Bring it to share!
Not familiar with December Daily? Check out Ali's blog. There's a link
to the right--->

Sunday, October 31, 2010

Monday, November 8, 2010

November 8 is fast approaching!
We are having a Christmas gift tag exchange.
If you want to participate in this, please bring 14 of the same tag.
It was suggested to use a new technique that you haven't used before.
(No, this photo is not recent, taken January 2010, but we all know, it's on its way...)
Just a reminder, in December 13 we'll be having a potluck.
We are going to have a potluck supper.
Meat and drinks will be provided.
Everyone else can bring whatever you wish - salad, dessert, appetizer.
We are going to have an embellishment grab bag. Please gift wrap them.

Thursday, October 7, 2010

New Stamps + Copic Markers= Cute Cards

Just finished 3 Christmas Cards using the new Jingle Tots Stamps and Copic Markers.  Thought they are really Cute!  Hope to make more for the Holidays!    Diana T.

Wednesday, October 6, 2010

Monday is right around the corner!

Don't forget, next Ladies Night Out is this Monday, October 11, 6-7:30! Bring your sketch and projects inspired by it!

Now, check out these flowers from the sassafras blog: Click here. Then scroll down.

Monday, October 4, 2010

Alert: Janet has been sucked into the Tim Holtz Vortex!

Yeah, yeah, yeah...I'd heard all about Tim Holtz and his fancy inks. And until last week, I had resisted Tim's charms. But now I'm hooked! I have been sucked into the Tim Holtz Vortex! :)

I've been using my Cat's Eye chalk for most inking and have been perfectly happy with it. Why change? I thought. Well, Tim's ink and blending tool create a completely different look. Cat's Eye chalk creates a rather defined edge on your paper, which is fine in many instances. But Tim's blending tool allow you to create a subtler, more aged look.


Let's use this chipboard as an example. I covered it with acrylic paint.

Then I used Tim's ink and blending tool to ink the chipboard. By the way, I'm pretty sure that using the blending tool counts as arm exercise, which is an added benefit. :)

Be sure to use a Splat Mat. If you don't have one, you really do need to buy one. It's much easier to use the blending tool with the Splat Mat. (You'll be making little circular motions with your blending tool, and the Splat Mat's slippery surface allows the tool to glide easily around your project.) And you'll keep your work surface clean, too.


Here are my completed chipboard tags. The walnut ink and blending tool helped me create just the look I wanted for my project!

I made these tags for my Halloween tree. You can see pictures of the tree on my blog,
Of Cats and Cardstock.

For those of you who have not yet tried Tim's inks and blending tool, FEAR NOT! They're easy to use, and you'll LOVE the results!

Sunday, September 26, 2010

Challenge completed!


I finished my challenge today and really like how it turned out.  Just got the Newest Page Maps 2 and think I'll be using my page maps a lot more!   Diana T.

Sunday, September 19, 2010

September 2010

September Ladies Night Out.

Janis is demonstrating a technique she either dreamed up or saw somewhere on the internet, she can't remember which! Either way, it's a cool technique. Get a plastic baggie and your spray inks out and give a squirt or two inside, put in your tag (she used the clay coated tags from Memory Bound) then squish it all around.

Remove it, dry it, add another color, into the same baggie.
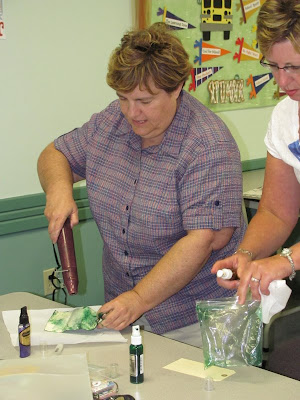
And this is what you get:

Here's a different tag she created at home and used on a layout about her grandson.

RaNae created a delightful book from a box. She filled it with photos from childhood on up and did it in a Tim Holtz shabby style but also incorporated many other techniques she's recently learned. Great work RaNae!

Karen finished her travel album. She's been working on it for several months. It's great to see projects come to completion! Feels great to get them done too!

Diane made another of album for her grandchild. All ready for the pictures, to be added as time goes by. What a great gift for a busy mom!

And our challenge for October...pick a sketch, any sketch, and be inspired by it to create a layout, card, or anything you like. You can find sketches in many magazines, and also online at pagemaps.com, and scrapbooks,etc.

Saturday, September 11, 2010

Antique Jamboree

Historic Valley Junction is having their annual Antique Jamboree tomorrow, Sunday, September 12, 8am - 4 pm.

Check this link for all the details!

Friday, September 10, 2010

Caramel apples, Scrapbook style

It's Caramel Apple season--officially!  However, my grandson got a head start at the the Iowa State Fair and had to have one (with nuts) there.  I wanted to put a c.apple on the the SB'd pages, so I experimented and came up with a fun and very "real" looking C. Apple--at least the Grandkids were impressed.   Just cut out 2 apples (we have one in our die cuts at the store) or use the cricut, cut one in red or green and one in "caramel" brown.  Layer them with a popcycle stick between and don't forget to cut your "caramel" back a little to let your apple peek through.  Then use Glossy Accents in a thin layer over the "caramel".  Add real nuts or very small pebbles while still wet  and you have a very impressive Caramel Apple for your layout! 
If you want a "bite" out of it, carefull tear the bite out and wiggle a little piece of cream color in so it peeks out too!

Saturday, August 28, 2010

Printer Tray Frenzie!

Yes I made it in!!!  Just wanted to post my latest projects--(on display at the store)--Printer Trays that can absolutely be done up for any holiday or occasion!  I think they would make perfect one of a kind gifts.  --and the red one---just a little red spray paint (or any color) and you have a color co-ordinated tray!  This is a good way to use up a lot of the little SBing trinkets you have gathered up along the way!  Have fun!
                                                                                                                               Diana T.

Thursday, August 26, 2010

AUTO ISO: the mojo killer

Hi Ladies. Check out this article by Kelly Willette at www.willettedesigns.com
 She talks about taking your camera out of auto ISO mode. I tried it
and I can certainly see a difference. Plus she has the cutest little
owl on her posts. But watch out, she has some amazing photography and
ideas, you might be there a while!
http://willettedesigns.com/2010/08/auto-iso-the-mojo-killer/

~Fonda

Saturday, August 21, 2010

Sewing on your layouts


Attention--- I have tried a new technique that I once thought was only supposed to be done on cloth! I have actually stitched on some pages to go in a junk binder. It really wasn't that hard once I got to learn how to control the sewing machine! In the latest issue of "Scrapbooking Tips and Tricks" by Creating   Keepsakes, there is an easy to understand (with pictures) explanation of how to use machine stitching on layouts, cards, page accents, etc. My photographer (Fonda Darter) has snapped some photos of my first attempts and you can see it is far from perfect but alot of fun! try it out you may like it too. Janis Timmons.

Welcome to Ladies Night Out

Bring your projects to share! Come to a fun night and meet with scrapbooking friends to share ideas, show projects, and chat about scrapbooking! It's FREE!
Next Ladies Night Out is September 13 at 6-7:30. See you there!
We're in Ankeny, Iowa.